Print Tax Bills
The Print Tax Bill function will assist you in printing tax bills. There are many options in printing bills, as well as the format of the bill itself. You can choose from the traditional 3 part bill form, where the bottom third is removed and retained at the town office before mailing the other two thirds to the taxpayer. The taxpayer would then keep the middle portion for his or her records and return the top portion with the payment. The alternate tax bill format was designed to be sent to the taxpayer and they return the bottom third with the payment (see Tax Bill Setup). If you elect to use the alternate tax bill format, you must make certain to either print a duplicate set of bills (the entire page) to retain for your records, or you should export a copy of the bills to PDF format for reference.
To Print Tax bills, choose Utilities | Print Tax Bills. A warning dialog box may display if you have unassigned credits. If you are not sure if the credits need to be assigned, select No to review the credits and if need be, assign the credits (see Assign Credits to Warrant Function). If you are satisfied the credits should not be assigned select Yes to continue.
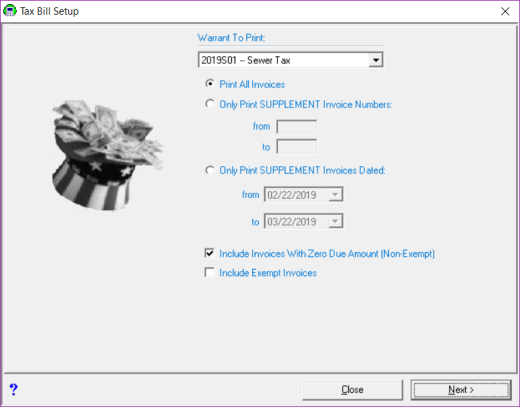
The Tax Bill Setup dialog box displays with many options. The first step is to select the Warrant to Print by using the drop down box. Once the Warrant is selected, the program provides you with the flexibility to print all invoices or to only print supplemental invoices. When selecting to print only supplemental invoices you may choose between printing the bills by Invoice Numbers or by the invoice date by selecting the appropriate radio button.
There are two additional check boxes at the bottom of the window. The first, Include Invoices With Zero Due Amounts (Non-Exempt), is used to send or exclude bills with a zero due amount. For example, if you choose not to send these bills, anyone one who had a credit assigned that paid off their entire bill, will not receive a bill. The next check box, Include Exempt Invoices, allows you to print bills for properties that are exempt (e.g. municipal buildings, schools, churches). A check mark in the box means you have selected this option, if you do not want these options click in the box to delete the check. Once your selections are complete, select Next and a dialog box displays showing you the number of tax bills to be printed. Click Yes to display the Tax Bill Setup dialog box.
Depending on the tax bill format you selected, the Tax Bill Setup screen will display slightly different. The traditional bill format offers two message text boxes that can be used for important information you want your tax payers to know, or they can be left blank.

The alternate bill format has more room for messages, so the message text boxes are removed and an Include Custom Message link has been added, which gives you an additional formatting option.
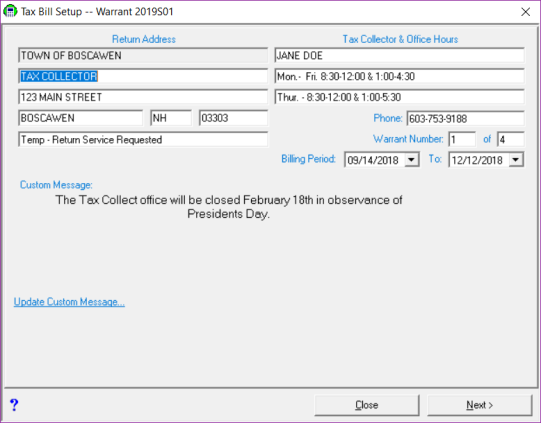
The Return Address and Tax Collector & Office Hours fields are populated from the Town Settings table (see Town Settings). However, if you need to change or update any of the information you can type the changes into the text boxes without having to exit the process.
The Warrant Number text boxes will default to the number of this billing for the warrant you select. For example, if you selected to print your 2018P02 warrant, the text boxes would default to 2 of 2. If this information is incorrect, type in the correct information in the text boxes. Select Next to continue.
The Tax Bill Setup dialog box will display.
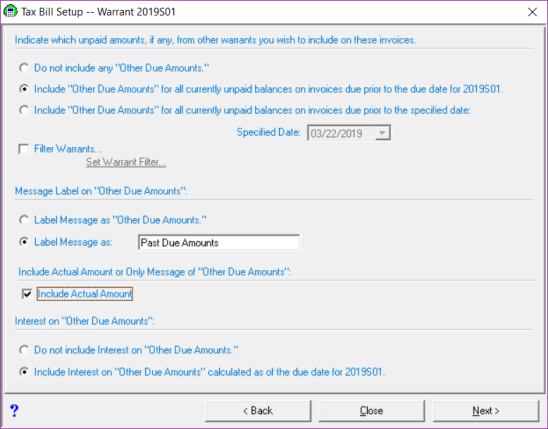
This screen will allow you to designate which unpaid amounts, if any, from other warrants you wish to include as “Other Due” amounts on the tax bill. Some of our towns bill for Water and Sewer in the Collect system, however, they do not want to include them in the “Other Due” amount section on their property bills. In order to accommodate all our clients, we offer the following options:
Indicate which unpaid warrant to include in the Other Due Amounts:
- Do not include any "Other Due Amounts" -- This option will eliminate other due amounts from printing on the bills.
- Include "Other Due Amounts" for all currently unpaid balances on invoices due prior to the due date for the 2018P02 (or the bills you have selected to print) -- Selecting this option will include Other Due Amounts which will be overdue as of the due date of the bills you are printing. For example, you have a timber tax bill with a due date of November 15th and the 2018P02, which you are about to print, has a due date of December 1st. Using this selection, the timber tax bill would be included as an Other Due Amount. If the timber tax had a due date of December 15th, it would not be included.
- Include "Other Due Amounts" for all currently unpaid balances on invoices due prior to the specified date-- This option offers more flexibility, as it will allow you to specify the cut off date for which you do not want to include invoices as Other Due Amounts. Using the timber tax example with a due date of November 15th, if you want to include other unpaid invoices, but not the timber tax, you could select this option and set the date to November 14th. Then all outstanding invoices due on or before November 14th will be included, but not the timber tax.
- Filter Warrants -- This check box is used in conjunction to the last two due date options and allows you the option of selecting the warrants you want included. For instance, you might want to include every warrant except the Water/Sewer bills. Select Filter Warrant and check each warrant you want included.
Message Label on Other Due Amounts:
- Label Message as "Other Due Amounts"-- If you choose to include other due amounts on the tax bill, the default message on the printed tax bill is "Other Due Amounts".
- Label Message as ___________ -- This option allows you to provide a label different than the default "Other Due Amounts." Some examples include "Past Due Amounts" or "Overdue Balances" but you can choose any label you'd like, provided it fits.
Include Actual Amount or Only Message of "Other Due Amounts"
- Include Actual Amount -- Leaving the check box unchecked will include the "Other Due Amounts" label but not the actual amount on the bills. If the check box is checked, the sum of the current due amount and any “Other Due Amount” you’ve chosen to include will display on the bill.
Interest on Other Due Amounts:
- Do not include Interest on "Other Due Amounts"-- If you decide to include Other Due Amounts, you can now select to not include interest to the due date of the billing. In the past, the Other Due Amounts included interest to the due date of the bills you were printing. For example, you are printing your 2018P02 with a due date of December 1st, 2018 and several taxpayers have outstanding 2017L01 invoices. Typically, the Other Due Amounts for 2017L01 invoices would include interest calculated to December 1st. Selecting this option would only print the principal amount owed for the lien.
- Include Interest on "Other Due Amounts" calculated as of the due date for 2018P02 (or the bills you have selected to print) -- Any Other Due Amounts will be shown with interest through the due date of the bill you are printing. The drawback to this is that taxpayers who pay prior to the due date of the current bill will actually overpay if they include the exact Other Due Amount indicated on the bill, as this amount includes interest up to the due date. There's no perfect solution, which is why the Other Due Amounts message indicates the taxpayer should call for proper payment amount.
Once you have set your Other Due Amount preferences, they will be saved. So, as long as your selections are still valid, you will be able to skip past this section the next time you create bills. However, if you selected an option with a date, you will need to change the date each time you process bills. Click Next to advance to the second Tax Bill Setup screen.
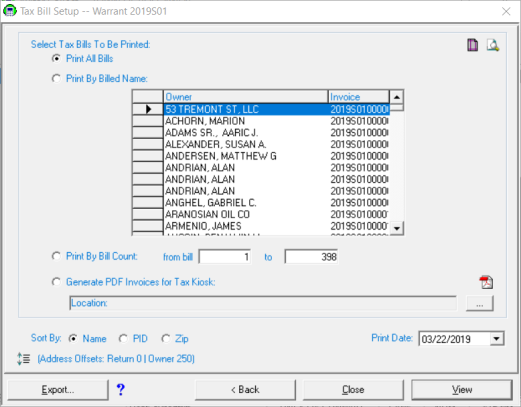
There are three print options:
- The Print All Bills radio button allows you the ability to print all the bills for the selected warrant.
- The Print By Billed Name radio button allows you to print bills for an individual or group of owners. This selection is commonly used when you have a printer error and you need to reprint a group of bills. Select an owner from the grid by clicking on the owner name. If you only need to print this bill, that is all you have to do. If you need to print a group of bills, highlight the first record to be printed, click the arrow to the left, and while holding down the shift key, scroll to the last record you wish to print and select it.
- The Print By Bill Count radio button allows you to print a range of bills by entering the appropriate page range, keeping in mind that each bill is a page.
The Generate PDF Invoices for Tax Kiosk radio button (only visible as part of the Comprehensive Tax Kiosk configuration) allows you to create PDFs of your tax bills that will be uploaded to the Tax Kiosk. This process should be completed at the time you are printing tax bills. (See Creating PDF Invoices for Paperless Notification )
The next option is the Sort By, which will tell the system in what order you want the bills to print (Name, PID, Zip). Finally, use the date picker to update the Print Date text box. The date you select is the date that will print on the tax bills.
If you are using an outside agency to print your tax bills, select Export, confirm you want to export the tax bills, and confirm your print date. The Browse for Folder dialog box displays. Use this dialog box to tell the system where you want the file to be saved. We recommend your desktop, as it is easy to find the files. The export will create a file on your desktop that is named TAXxxxxP0x.TXT (e.g. TAX2018P02.TXT for the 2018 2nd issue billing). This file will need to be sent to the outside printing agency.
If you print your bills in house, select the correct Print Date from the date picker, and click View. After confirming the Print Date, the first Bill image will display. Note, when printing tax bills within the Tax Collect system, traditional paper invoices will not be generated for parcels on which the taxpayer has opted-in for Paperless Notification. You can click on the right arrow to advance through the bill file to display each individual bill and the left arrow to go back. Make sure all the information is correct and then click on the printer icon to print the bills.
Display of "Current Use Credit" on Tax Bills
To eliminate confusion among tax payers regarding the "Current Use Credit" displayed on tax bills we have removed it as a separate line item displayed in the assessment information. Instead of displaying "Land Value", "Current Use Credit", and "Building Value" on the tax bill, the bill will just display "Taxable Land Value" and "Building Value." The single "Taxable Land Value" is equal to the "Land Value" minus any "Current Use Credit" -- shown as a single number rather than two. If a parcel has current use, the bill will display a message indicating "**Taxable Land Value Includes Current Use**" so that tax payers will know their assessments still reflect their current use assessments.
Note: If you want to print the tax bills with the separate "Current Use Credit" line item (however confusing it may be to your taxpayers) you can configure your system to do so. To configure it to print the old way, select Utilities | Town Settings. Click on the Miscellaneous Tab, Tax Bill Setup tab, and then check the "Display Current Use Credit as separate assessment on Property Tax Bill" box.
This process should be used as a guideline, and not as a replacement for understanding the process.
PRINT TAX BILLS:
-
Utilities | Print Tax Bills
-
Choose Warrant to Print from the dropdown menu.
-
Select options for the bills you want to print from that warrant.
-
Click Next.
-
Confirm accuracy of the Return Address, Tax Collector, and Office hours.
-
Click on Include Custom Message to update with RSA 76:11-a (only on PROPERTY tax bills. NOT included on Sewer or Water bills). Depending on whether you are using paper with the RSA printed on the back or not, choose the appropriate custom message from the following options:
-
Per RSA 76:11-a If you are elderly, disabled, blind, a veteran, or veteran’s spouse, or are unable to pay taxes due to poverty or other good cause, you may be eligible for a tax exemption, credit, abatement, or deferral. For details and application information, contact the Assessor’s or Selectmen’s office. -or-
-
PLEASE SEE THE BACK OF THIS TAX BILL FOR MORE INFORMATION ON RSA 76:11-a. -or-
-
PLEASE SEE THE INSERT FOR MORE INFORMATION ON RSA 76:11-a.
-
-
Select Save.
-
Click Next.
-
Select your options for which, if any, unpaid amounts you want to include on these tax bills.
-
Click Next and confirm your choices.
-
Adjust Print Date as needed.
-
Select View.
-
Confirm Print Date.
-
View the bills to confirm they display as expected before you print/mail.
-
Save file as PDF via the envelope icon (at the top, left of the screen).
-
Click OK, and then OK again.
-
Choose Desktop
-
Rename file.
-
-
Print 1 tax bill, fold, and stuff into envelope to verify address(es) can be seen in window(s) fully.
-
If address(es) cannot be seen fully, you can adjust placement up, down, right, and left.
-
To Save as a PDF for future reference:
-
Select View.
-
Click the envelope icon at the top, left of the screen.
-
Click OK, and then OK again.
-
Choose Desktop
-
Rename file.
Once you have completed this process, continue to Updating Current Tax Information Online.
If you utilize the option of displaying PDFs on the Tax Kiosk, you will need to Upload PDFs to the Tax Kiosk.
Now you are ready to generate the tretts and treadme files for Real Estate Service Companies.
-
Utilities | Print Tax Bills
-
Choose Warrant to Print from the dropdown menu.
-
Select options for the bills you want to print from that warrant.
-
Click Next.
-
Confirm accuracy of the Return Address, Tax Collector, and Office hours.
Note: There is no need to add a Custom Message, as this field does not exist in the .txt file for the printer.
-
Select Next.
-
Select your options for which, if any, unpaid amounts you want to include on these tax bills.
-
Click Next and confirm your choices.
-
Adjust Print Date as needed.
-
Click the Export button.
-
Save to Desktop.
-
Send via email.
To Save as a PDF for future reference:
-
Select View.
-
Click the envelope icon at the top, left of the screen.
-
Click OK, and then OK again.
-
Choose Desktop
-
Rename file.
Once you have completed this process, continue to Updating Current Tax Information Online.
If you utilize the option of displaying PDFs on the Tax Kiosk, you will need to Upload PDFs to the Tax Kiosk.
Now you are ready to generate the tretts and treadme files for Real Estate Service Companies.
-
Utilities | Print Tax Bills
-
Choose Warrant to Print from the dropdown menu.
-
Select options for the bills you want to print from that warrant.
-
Click Next.
-
Confirm accuracy of the Return Address, Tax Collector, and Office hours.
-
Click on Include Custom Message to update with RSA 76:11-a (only on PROPERTY tax bills. NOT included on Sewer or Water bills). Depending on whether your outside printing company is using paper with the RSA printed on the front or back or if you will be mailing an insert, choose the appropriate custom message from the following options:
-
Per RSA 76:11-a If you are elderly, disabled, blind, a veteran, or veteran’s spouse, or are unable to pay taxes due to poverty or other good cause, you may be eligible for a tax exemption, credit, abatement, or deferral. For details and application information, contact the Assessor’s or Selectmen’s office. -or-
-
PLEASE SEE THE BACK OF THIS TAX BILL FOR MORE INFORMATION ON RSA 76:11-a. -or-
-
PLEASE SEE THE INSERT FOR MORE INFORMATION ON RSA 76:11-a.
-
-
Select Next.
-
Select your options for which, if any, unpaid amounts you want to include on these tax bills.
-
Click Next and confirm your choices.
-
Adjust Print Date as needed.
-
Select View.
-
Save file as PDF via the envelope icon (at the top, left of the screen).
-
Click OK, and then OK again.
-
Choose Desktop
-
Rename file.
-
-
Send this PDF file to the off-site printing company.
Once you have completed this process, continue to Updating Current Tax Information Online.
If you utilize the option of displaying PDFs on the Tax Kiosk, you will need to Upload PDFs to the Tax Kiosk.
Now you are ready to generate the tretts and treadme files for Real Estate Service Companies.

|
|